I must confess that we started working on our kitchen remodel almost 16 months ago. In my defense, I started my blog last September, which means I was way behind telling you about my home projects from the very beginning. I also have been writing about current things, and so … telling you about projects that we’ve done in the past kept getting delayed more and more.
My long list what I wanted and needed to tell you really overwhelmed me, and when I’m overwhelmed, I tend to put things off.
I hope you will not judge me in that regard.
However, I can’t continue to put off what I want to do. And that is to tell you about our home. Because we’re proud of it and because I think you’ll like it. Because my blog would not be complete if I keep things from you.
There’s no time like the present, and I’ve got to start somewhere, so I’ll start with telling you the tale about our kitchen.
By the way, I’ll spread this story out over a few chapters. Otherwise, the post would be way too long.
So here goes …
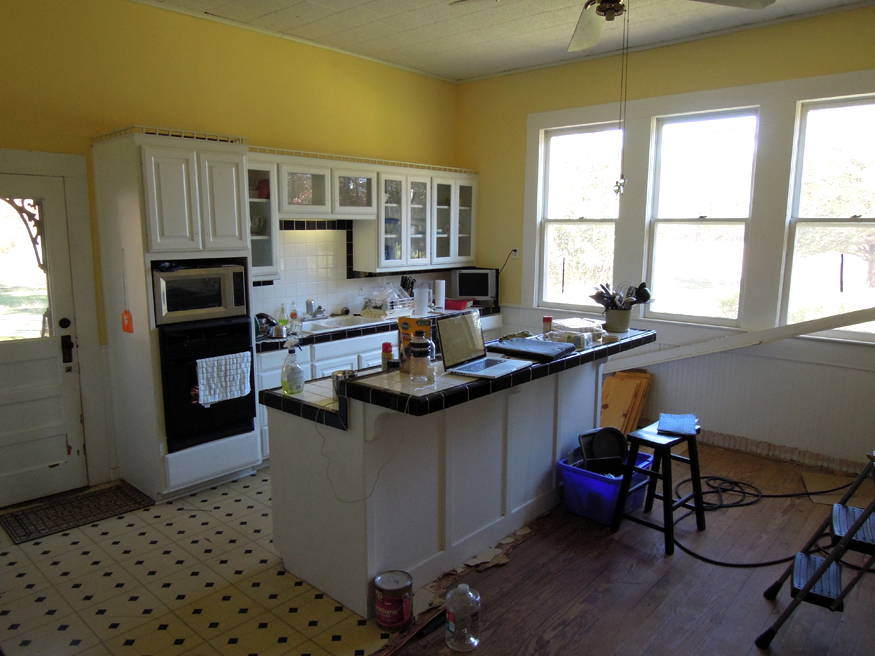
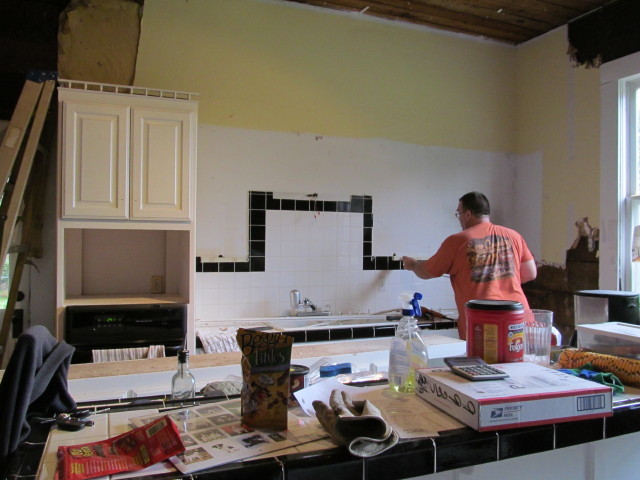
Here’s a photo of the kitchen, the way it used to be. The way it was when we first bought our place.
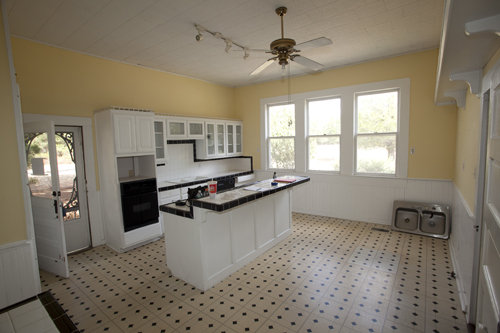
Truly, the kitchen wasn’t terrible, not by any stretch of the imagination. But there were several things we just didn’t like.
Here’s what we absolutely hated, didn’t want, or just didn’t suit our fancy.
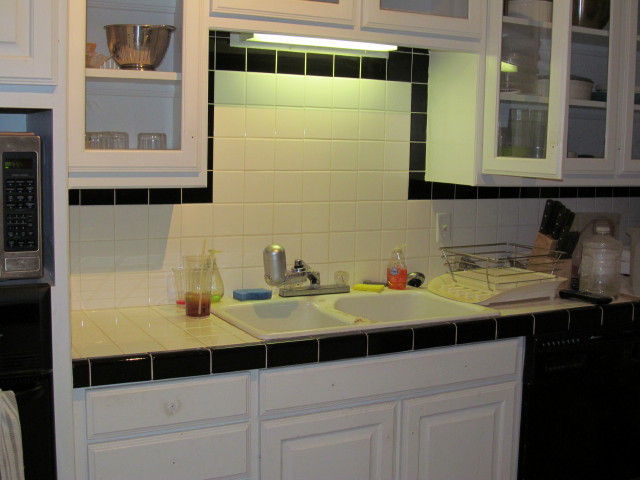
1. I’ve never been a fan of tile countertops. I just have never felt like I could get them clean enough.
2. We knew that hardwood floors were hidden beneath vinyl sheeting. Not acceptable. Hardwood will always trump plastic. Why anyone would ever want to cover up hardwood floors, I’ll never know.
3. Both my husband and I love to cook and we both prefer gas. The kitchen had an electric cooktop.
4. The cooktop was mounted in the island (a minor thing, but a gripe nevertheless). I normally like to use an island as a prep surface, not a cooking or cleaning area.
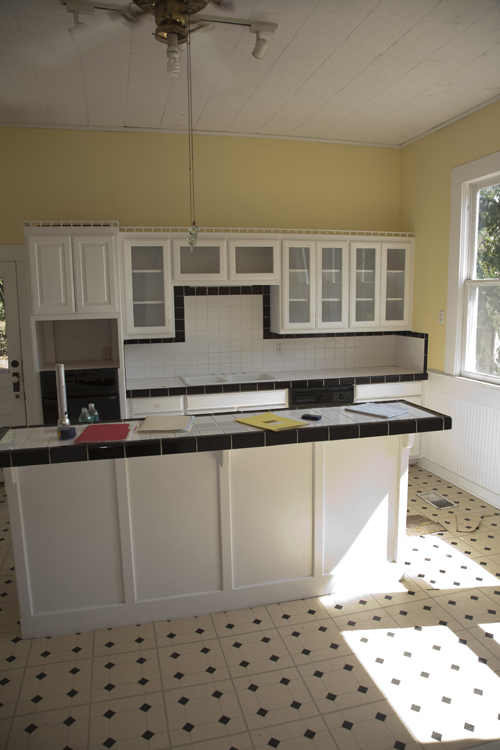
5. Mark didn’t like the island design. He prefers an island that’s all one level. Me too, actually.
6. There was only about 2-1/2 feet of walkway space between the island and the sink cabinetry. Totally inadequate. I’ve read differing opinions about the minimum recommended walkway clearance, but the general consensus is at least 3 to 4 feet. My husband is a big guy, and we knew the island definitely needed to be moved out a bit and that required moving electrical (which we didn’t want to keep anyway). I’m not sure why one of the previous owners decided to situate the island so close to the sink cabinetry. There was a HUGE wasted space on the other side of the island: 7-1/2 feet!
7. I’d prefer to see a pretty view when I wash dishes, not a tile wall.
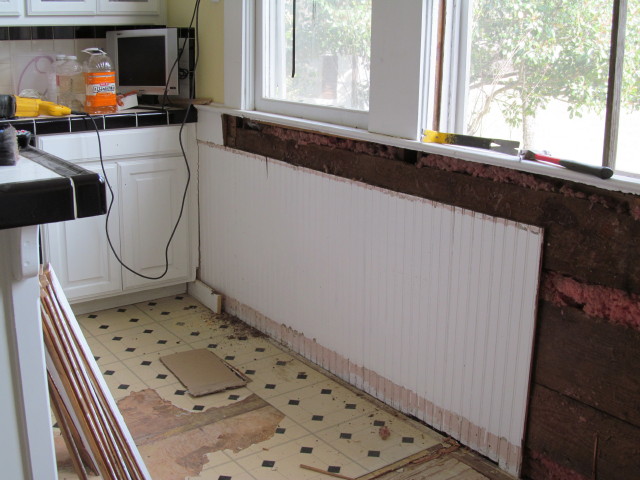
8. Our water heater used to be located in the cabinet next to the back door. The fact that the water heater was in the kitchen wasn’t a huge issue, but the rotten floor beneath it sure was. We knew we’d have to remove the water heater and possibly the cabinetry to repair the floor. As long as we had to move it, we wanted to move it to a more central location in the house, closer to the bathrooms.
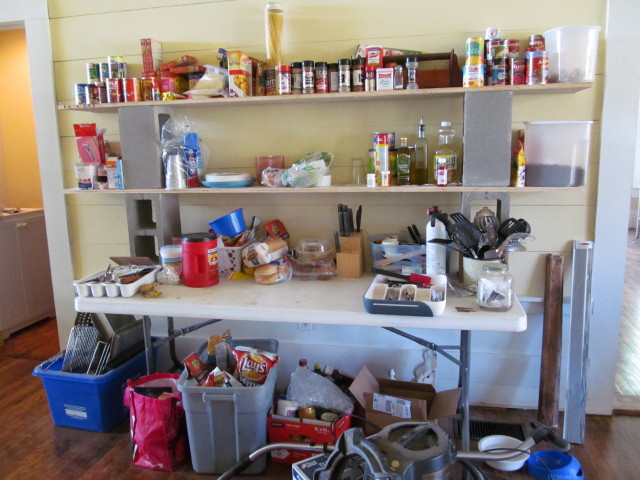
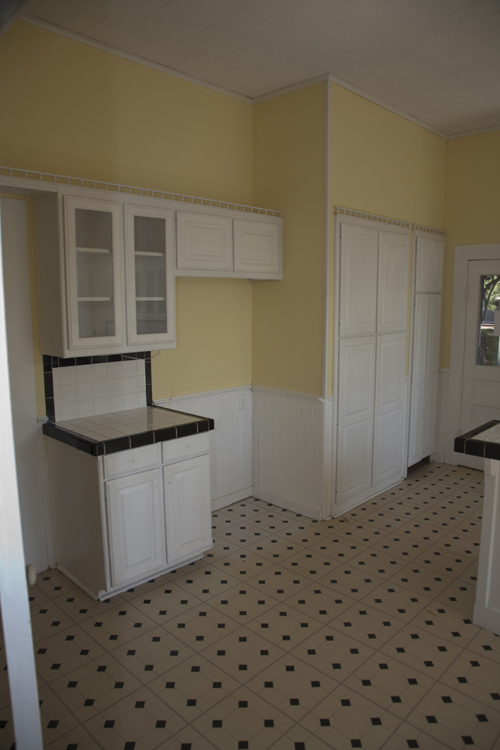 9. The pantry was located right next to the water heater, and it just wasn’t what I wanted. I’ve always wanted a walk-in pantry and I knew our kitchen square footage was certainly big enough to design one in.
10. The room beneath the windows was a vast amount of wasted space. Space that could be used for cabinets. We knew that we would replace the old leaky windows, and we could change make them a little smaller to fit cabinetry underneath.
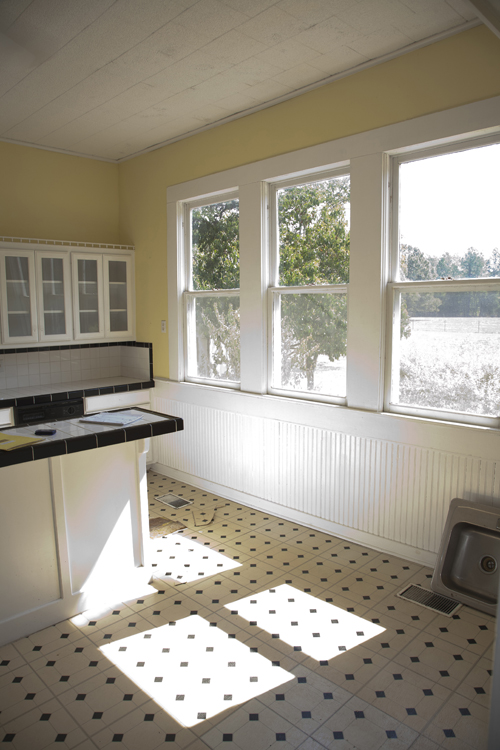
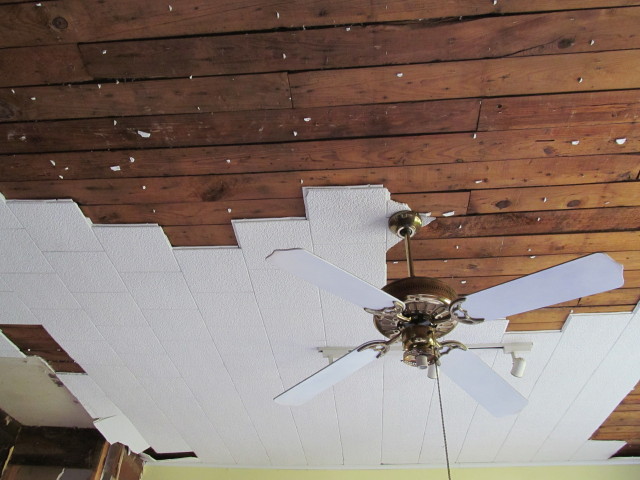
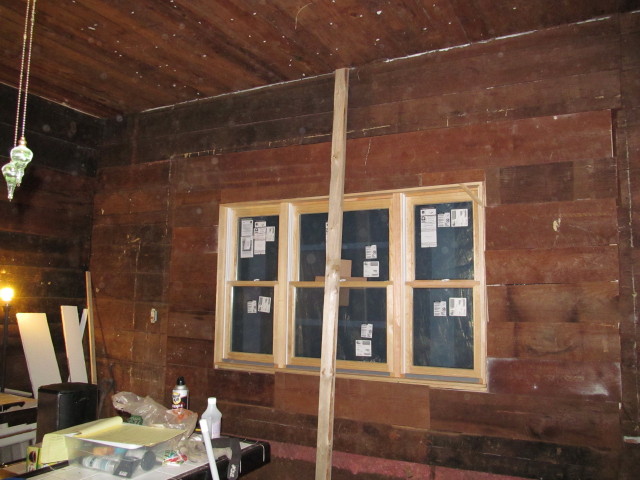
11. 12. 13. 14. The ceiling had acoustical tiles (yuck), a ceiling fan (yuck), track lighting (yuck), and drywalled walls (yuck) covering up (beautiful!) old rough-sawn pine walls. All of that had to go.
That’s all I can think of.
Now, I must say this. If we couldn’t have afforded it, we could have lived with the kitchen, no doubt. Again, it wasn’t that bad. But, the fact is that we had 14 reasons and had budgeted money for a kitchen remodel.
So that’s what we did. Remodel.
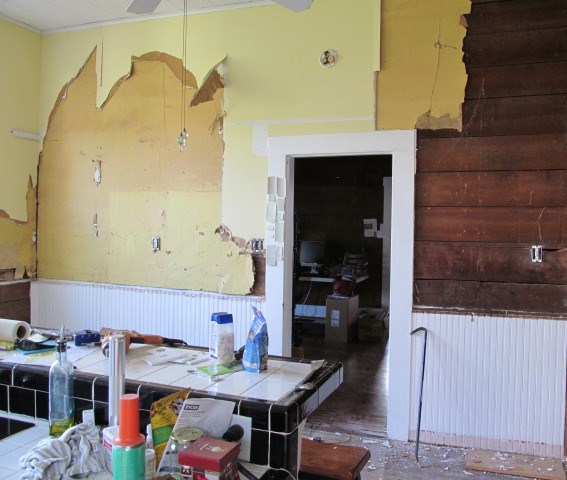
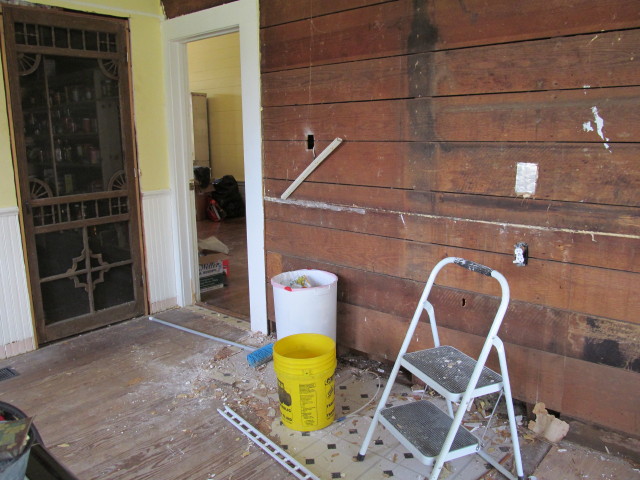
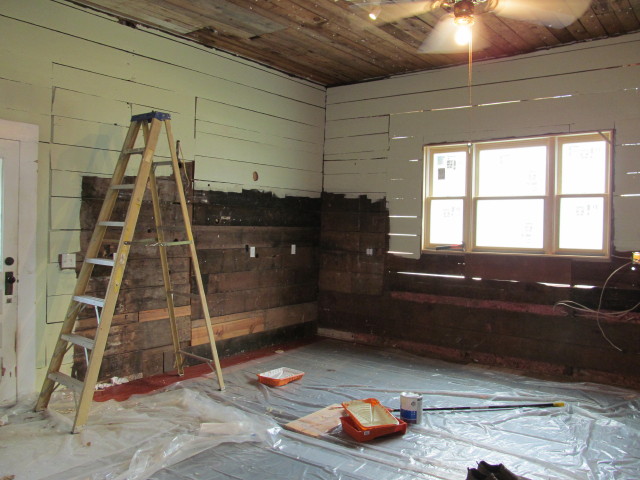
The first thing we did was start removing the drywall and the layer of old wallpaper. We also removed any cabinets not absolutely necessary to preparing meals.
 (We moved all of the cabinets to our garage and use them for storage.)
(You might notice that this project was done before our mudroom addition.)
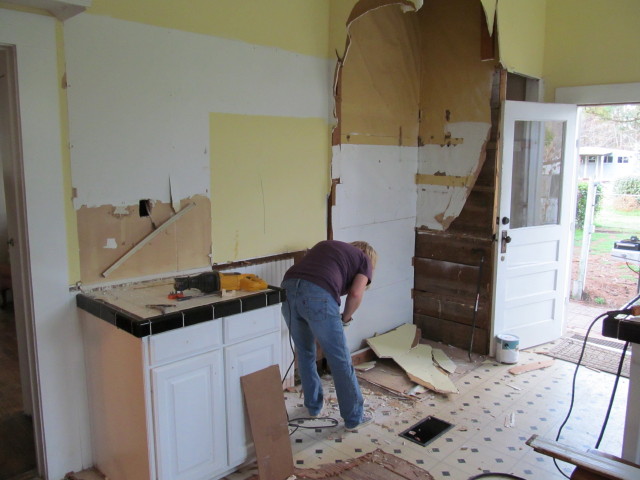
We also removed and trashed the ugly acoustical ceiling tiles.
Our kitchen ceilings are 12 feet tall, so a garden rake came in handy.
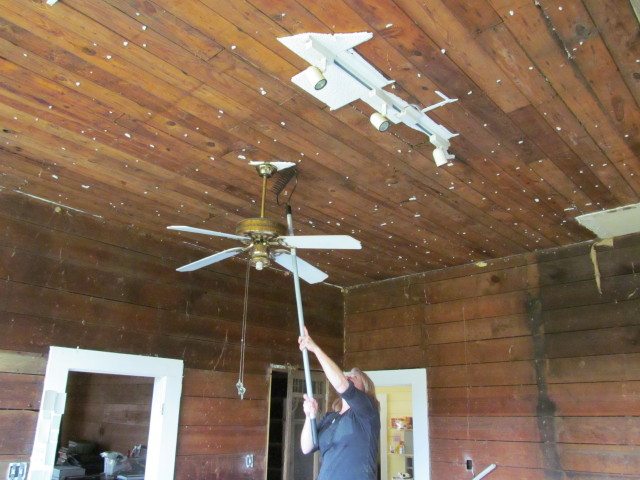
Removing drywall is always a messy job, but removing the acoustical ceiling tiles was even dirtier.
The ceiling tiles covered up large gaps between the boards, and debris from the attic rained down on our heads.
(We knew that blown-in insulation and attic filth would continue to fall through the cracks to the kitchen below, so that’s why we decided to install ceiling tins. I mean, who wants dirt and insulation in their food? That project was done much later.)

We also scraped up as much of the linoleum that we could get to before demo’ing the island and sink cabinetry.
(We were still cooking in this kitchen, so the cooktop and sink remained in place for as long as it could.)
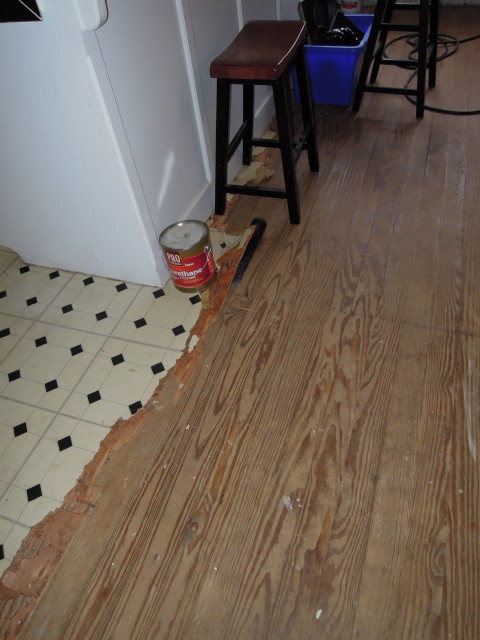
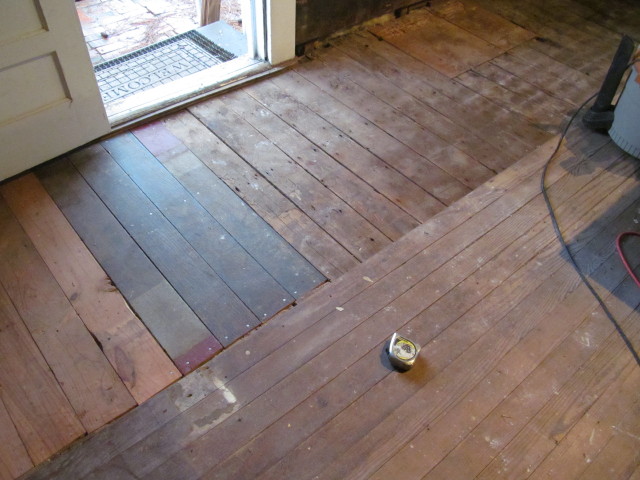
As you can see, beautiful old pine floors were lying in wait under the vinyl. We suspected they would be, but there was no way to tell beforehand what their condition would be.
We were surprised and so thankful to find that they were in pristine condition and there was no glue residue at all. Thank you, prior owners, for NOT glueing down the vinyl!
We also removed and saved the pink and white beadboard under the windows.
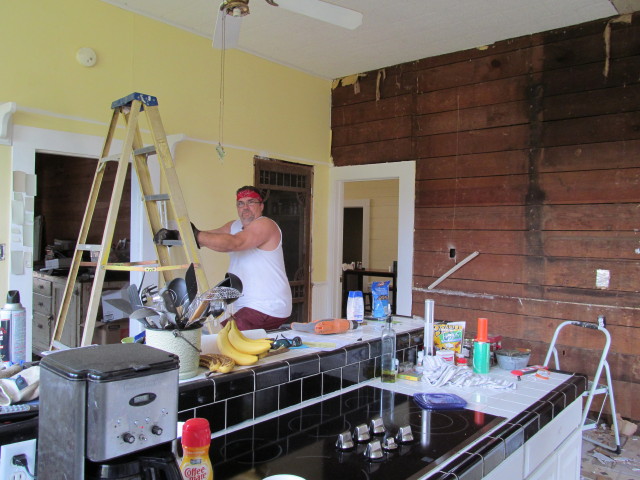
Meanwhile, while all this was going on, we were designing and ordering new custom cabinetry and windows. We also made a day trip to Houston to shop for granite countertops.
Skip forward 3-4 weeks or so. All the demo work Mark and I could do was done. Our new windows were installed, and our kitchen cabinetry was being built.
It was time for more involved carpentry. We hired a good friend in Austin, who came for a visit and helped us repair the rotten floor under the water heater.
Together, he and Mark replaced the existing windows with Jeld-Wen energy-efficient wood windows. It was an involved, labor-intensive, messy job to say the least.
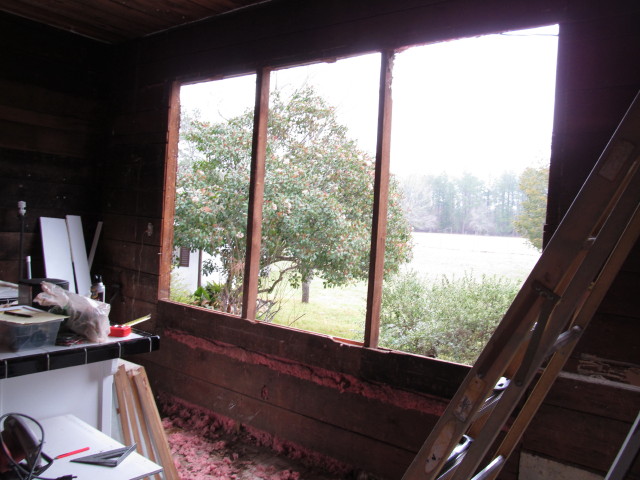
It was also February and cold and wet. They got it done as quickly as they could.
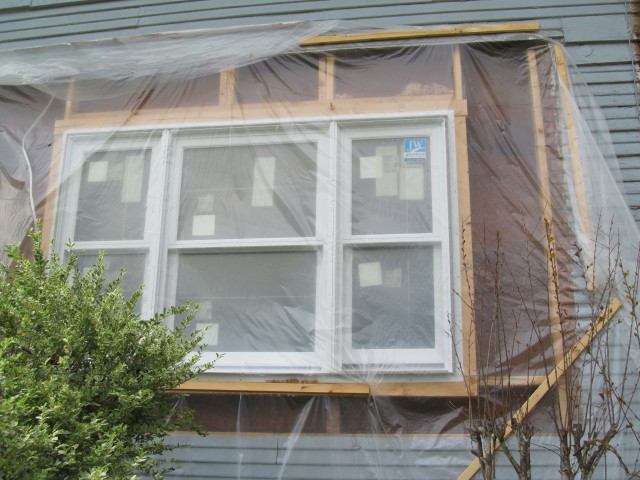
We tarped up the house to protect it from moisture until we could start our window, siding, and insulation replacement project.
(Another blog post long overdue and coming soon.)
Repairing the damaged floor was also high priority on our “to do” list that week. It had to be done before we could finish our kitchen.
I figured we’d only have to repair about a 3′ x 3′ square of flooring. That was all that was damaged, right?
Nope.
I couldn’t have been more wrong.
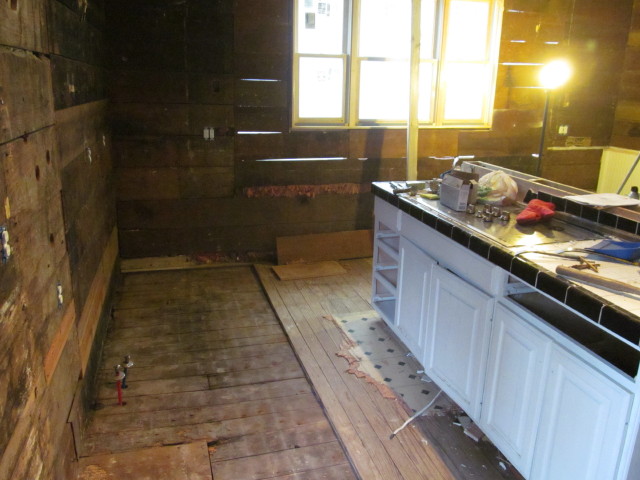
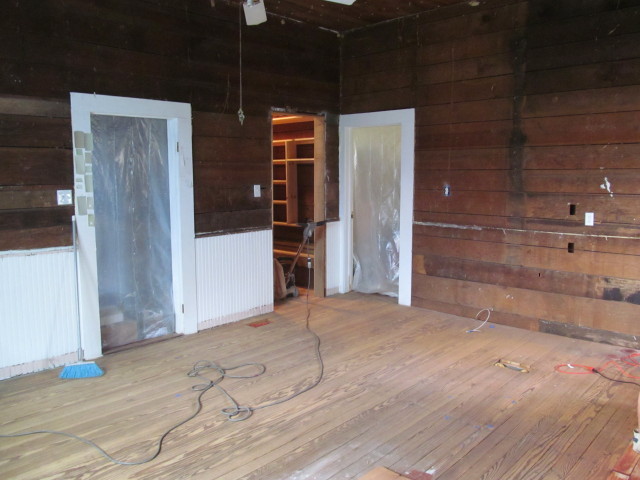
Not only did we have to repair the flooring, but we had to repair a section of rotten subfloor and a section of beam under the house. Also, in order to patch in the floor and make it look right, we had to remove about a 4′ wide span of flooring from one side of the kitchen to the other.
This meant the sink and all the cabinetry on that wall had to go.
After the cabinets were gone, the floor repair work began.
The guys repaired the subfloor, then the finished floor.
Our electrician was here one day also, doing all the rough-in work necessary for our new lights and appliances.
Things were a mess, but we were making progress.
(By the way, if we sealed the gaps in our walls when we completed our window, siding, and insulation project.)

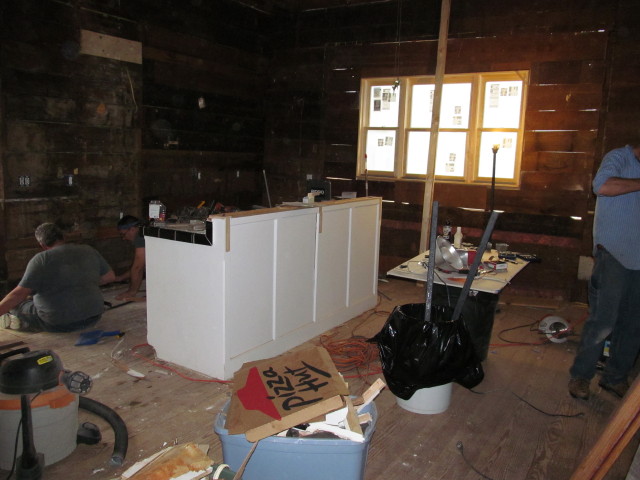
Last but not least, Bill and Mark also found the time to build the ample walk-in pantry that I wanted. We borrowed some square footage from the room adjacent to the kitchen — (which is our home office) — to build it.
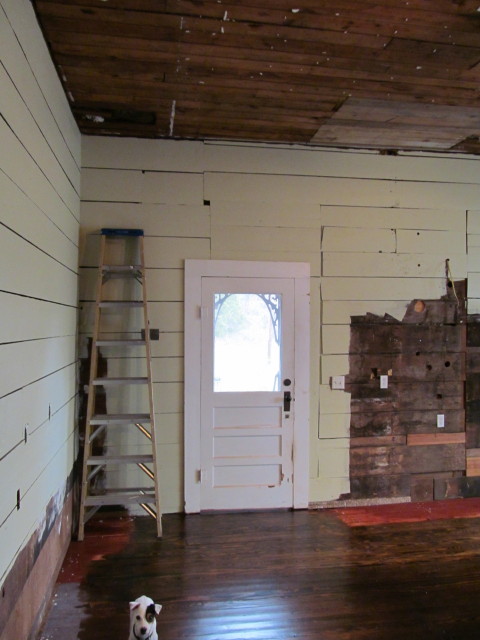
(We discovered the wonderful old screen door at Discovery Architectural Antiques.)
By the end of that week, Mark, Bill, and I had demo’d the island and one remaining wall of cabinetry, which meant Mark and I would have to rough it until our kitchen was finished. We set up a temporary kitchen in our dog trot.
After Bill headed back home to Austin, Mark and I rented a floor machine and refinished the hardwood floors in the kitchen and pantry.
The old red paint on the reclaimed, patched floors proved too stubborn for the sanding machine we rented. I had to resort to Plan B: sanding the floor with a hand sander.
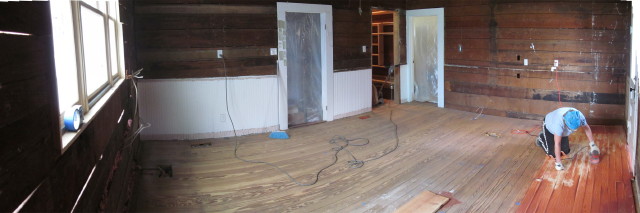
In case you’re wondering, we salvaged these floors from an old, abandoned house in Grapeland. We used identical floor boards in our mudroom, where I elected to keep some of that old red paint.
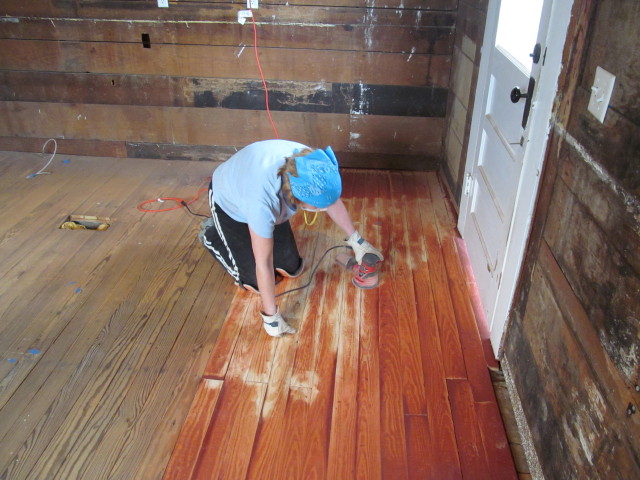

I was able to remove most of the red paint, but you could sure tell the patched floor from the original floor, so we stained both to match them as best we could. We used Minwax’s Dark Walnut stain.
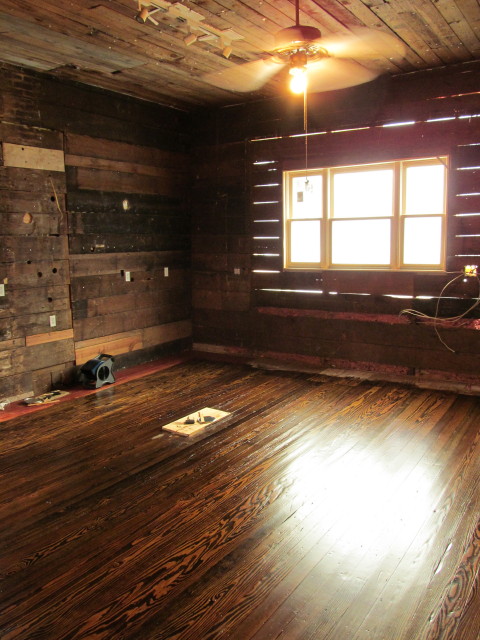
After finishing the floors, we concentrated on painting the walls. We protected the floors, of course.
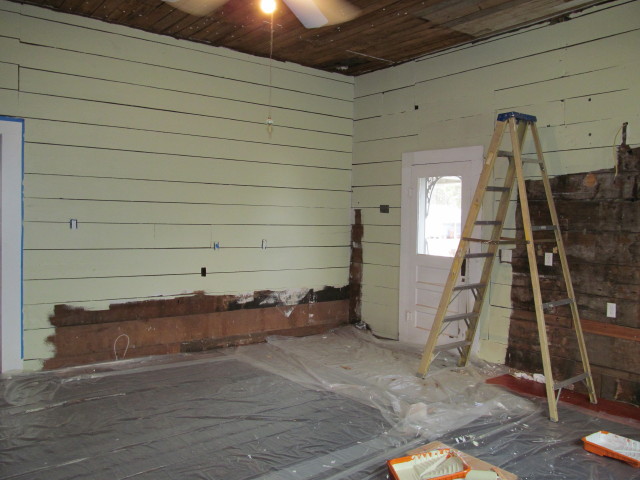
We painted the walls a lemony green. (It was a paint color we custom mixed. Email me if you want it.) It brightened the space considerably, and we knew the white cabinets would as well.
Of course, we didn’t paint in the areas where cabinets or backsplash would be installed.
It’s starting to come together …!
Can’t wait to share the next chapter with you.
******************************
I read and appreciate every comment. Thank you for letting me know what you think!

Looking good Kim! We’re considering renovating a house as well, just haven’t found the right one! Good luck!
Man, I don’t know how you lived without a kitchen for so long! How exciting to see those floors again.
It was tough, that’s for sure.
How exciting!
More!!! It’s like reading a really good book and you don’t want it to end……can’t wait!
Thanks, Jenny!
What an amazing transformation. I love your finished kitchen. My husband and I purchased a farmhouse built around 1897 and are renovating. What process did you use to refinish your floors (stain color, sealer)? I would appreciate any helpful hints you may have! I am still researching many of the projects we have to tackle.
Thanks,
Christa
Christa,
I’ll be happy to! I’ll email that info to you directly since the description is too long for a comment.
Hmmm, this would be a good idea for a blog post …! 🙂
Kim
Did you ever do that blog post?
First off I want to say great blog! I had a quick question in which I’d like to ask if
you don’t mind. I was interested to know how you center yourself and clear
your thoughts before writing. I’ve had a tough time clearing my mind in getting my ideas out.
I do enjoy writing but it just seems like the first 10 to
15 minutes are generally lost just trying to figure
out how to begin. Any suggestions or tips? Many thanks!
Valuable info. Lucky me I discovered your web site by chance, and I am shocked why this twist of fate did not took place earlier!
I bookmarked it.
Please let me know if you’re looking for a author for your weblog.
You have some really great posts and I think I
would be a good asset. If you ever want to take some of
the load off, I’d really like to write some articles
for your blog in exchange for a link back to mine. Please blast
me an e-mail if interested. Thanks!
i noticed in your pictures of the kitchen wall that sunlight looked as if it were coming through the planks. If this is true, did you leave it that way? Seems like the wind would blow the rain right in. How do you account for this?
Louise Marie,
We sealed up the cracks in our walls when we did our siding, insulation, and window replacement project. You can see details of that project here: https://www.livingvintageco.com/2014/01/achieving-energy-efficiency-in-an-old-house/.
Highly energetic post, I loved that a lot. Will there bee a part 2?
I adore your mudroom. I would love to turn part of our upper deck into one. I don’t even know if I am on the right post anymore because I looked more – but can you tell me the dimensions of the mudroom? Thanks!
Crysti, our mudroom has an 8′ x 8′ footprint.
Thanks so much!
Just out of curiosity did you have your ceiling tile tested for asbestos before removal? I purchased a house with the same ceiling and want to remove it but heard that that type of ceiling normal contains asbestos. Love the transformation of the kitchen!
Sarah, we did not have the ceiling tile tested for asbestos. Quite frankly, I never thought of doing that. Looking back, perhaps it was because we could tell the ceiling tiles were relatively new.
Very creative & interesting & so much hard work! Could this become a “How-To” book for do-it-yourselfers?